लेखक: रविंद्र पारधी (Founder, Marathi AI Prompts) | शेवटचे अपडेट: सप्टेंबर २०२६ | वाचनासाठी वेळ: ८–१० मिनिटे
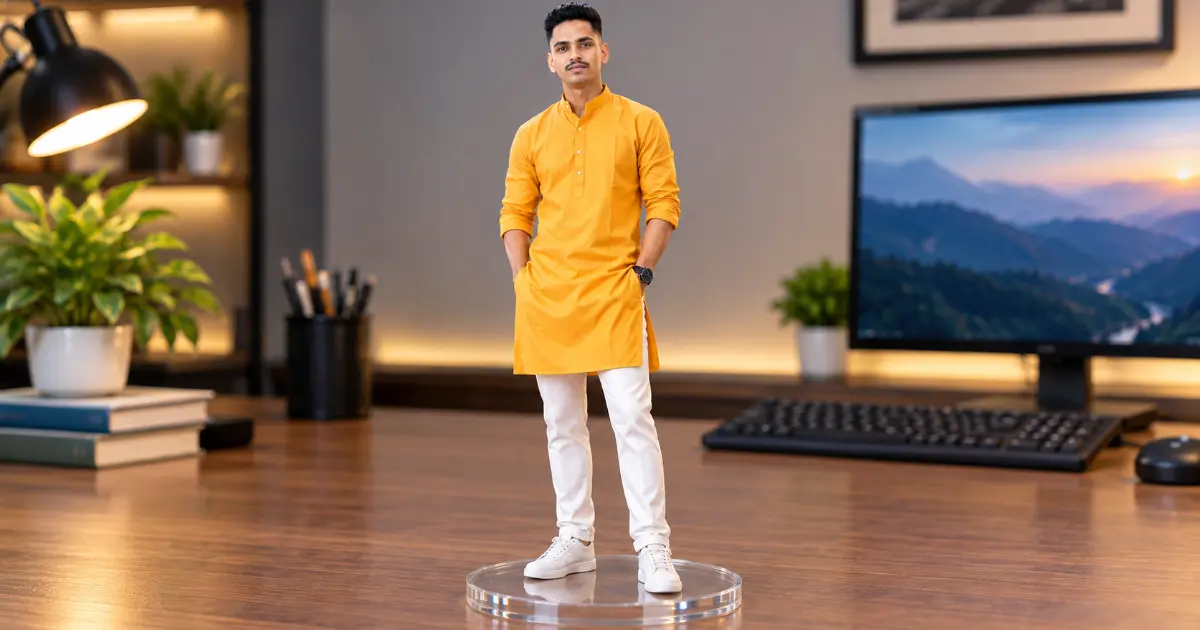
Nano Banana 3D Figurine Prompts वापरून स्वत:चा फोटो ealistic collectible figurine, cute miniature character किंवा packaged action figure मध्ये बदलता येतो. गेल्या काही काळात स्वत: चा फोटो collectible figurine, cute miniature character किंवा packaged action figure मध्ये बदलण्याची AI image trend लोकप्रिय झाली आहे. अशा प्रकारच्या AI images मध्ये स्वत:चा चेहरा आणि outfit जपत ealistic toy, miniature किंवा action figure look तयार केला जातो. हे figurine आणि miniature images तयार करण्यासाठी Google चे Nano Banana image-generation models देखील वापरता येतात.
Nano Banana म्हणजे काय?
“Nano Banana” हे Google च्या Gemini 2.5 Flash Image मॉडेलसाठी लोकप्रिय झालेले नाव आहे. Google ने हे image generation आणि editing मॉडेल ऑगस्ट 2025 मध्ये सादर केले. त्यानंतर Nano Banana Pro नोव्हेंबर 2025 मध्ये आले. पुढे Google ने 26 फेब्रुवारी 2026 रोजी Nano Banana 2 (Gemini 3.1 Flash Image) सादर केले, जे Nano Banana Pro मधील advanced capabilities आणि Gemini Flash ची वेगवान image generation यांचे combination देते.
टीप: या लेखात “Nano Banana” हा लोकप्रिय आणि सर्चमध्ये वापरला जाणारा term आहे. खालील prompts Nano Banana 2 च्या image-generation आणि editing capabilities लक्षात घेऊन दिले आहेत.
3D Figurine/ Miniature Trend इतका लोकप्रिय का आहे?
या ट्रेंडच आकर्षण तीन गोष्टींमध्ये आहे:
- Personalization: निकाल तुमच्या स्वत:च्या फोटोवर आधारित असल्यामुळे प्रत्येक result वेगळा वाटतो.
- Collectible-quality लुक: नुसता filter नाही, तर एखाद्या premium toy-store product सारखा professional लूक मिळतो.
- वेगवेगळे formats: एकाच फोटोपासून statue, keychain, action figure, desk-display किंवा संपूर्ण diorama scene असे अनेक प्रकारचे results तयार करता येतात.
या लेखात आम्ही अशाच 15 वेगवेगळ्या, ready-to-use Nano Banana 3D Figurine Prompts दिले आहेत (5 वेगवेगळ्या categories मध्ये विभागलेले), जेणेकरून तुम्हाला फक्त एक प्रकार नाही, तर संपूर्ण figurine/ miniature स्टाईलचं spectrum एक्सप्लोर करता येईल.
टीप: खालील सर्व prompts reference photo वापरून तयार केले आहेत. त्यामुळे AI tool मध्ये तुमचा स्पष्ट आणि चांगल्या lighting मधला फोटो upload करून त्यानंतर संबंधित prompts paste करा.
Nano Banana 3D Figurine Prompts कसे काम करतात?
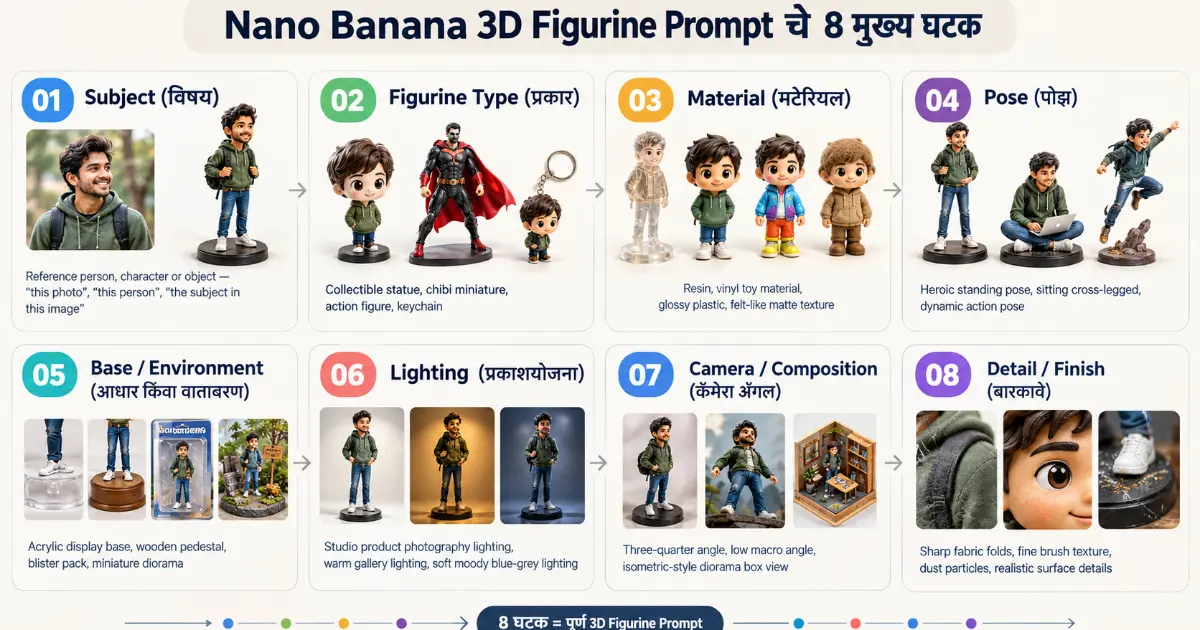
एक चांगला Nano Banana figurine prompt हा random शब्दांचा संच नसतो, तो एका ठराविक रचनेत (structure) लिहिलेला असतो. Google च्या अधिकृत image-generation promoting guidance नुसार, प्रभावी prompt साठी subject, composition, action, location, style आणि editing instructions यांसारखे specific details देण्याची शिफारस केली जाते. हि मूळ guidance सहा सर्वसाधारण घटकांवर आधारित आहे; आपल्या figurine/ miniature use-case साठी हीच कल्पना खाली 8 practical भागांत रूपांतरित केली आहे;
1. Subject (विषय) कोणाचं/कशाचं रूपांतर करायचं: this photo, this person, the subject in this image. Reference photo AI tool मध्ये स्वतंत्रपणे upload केला जातो.
2. Figurine Type (प्रकार) कोणत्या प्रकारचा figurine हवा; collectible statue, chibi miniature, action figure, keychain इ. Figurine type specific सांगितल्यास अपेक्षित style स्पष्ट करण्यात मदत होते.
3. Material (मटेरियल) पृष्ठभाग कसा दिसावा: resin, vinyl toy material, glossy plastic, felt-like matte texture. यामुळे figurine खऱ्या toy सारखी वाटते, फक्त “3D रेंडर” सारखी नाही.
4. Pose (पोझ) उभं, बसलेलं, action मध्ये: heroic standing pose, sitting cross-legged, dynamic action pose. पोझ स्पष्ट न सांगितल्यास अपेक्षित pose मिळेलच असे नाही.
5. Base / Environment (आधार किंवा वातावरण) figurine कुठे ठेवलीये: acrylic display base, wooden pedestal, blister pack packaging, किंवा संपूर्ण diorama scene.
6. Lighting (प्रकशयोजना) studio product photography lighting, warm gallery lighting, soft moody blue-grey lighting. Lighting मुळे figurine चा mood, shadows आणि product-photography feel नियंत्रित करता येतो.
7. Camera/ Composition (कॅमेरा अँगल) three-quarter angle, low macro angle, isometric-style diorama box view. यामुळे photography-style depth तयार होतो.
8. Detail / Finish (बारकावे) शेवटचा टच: sharp focus on fabric folds, visible fine brush texture, dust particles visible in the light beam. हे छोटे तपशील result ला realistic बनवतात.
थोडक्यात सांगायच तर: Subject + Figurine Type + Material + Pose + Base/Environment + Lighting + Camera Angle + Detail. हे आठ घटक एकत्र आले की एक पूर्ण, नेमका आणि परिणामकारक prompt तयार होतो, आणि याच रचनेवर खालील सर्व 15 prompts आधारित आहेत.
Prompt writing च्या मूलभूत तत्त्वांबद्दल अधिक सविस्तर वाचायचं असल्यास आमचा AI Prompt कसे लिहावे? Ultimate Beginner To Pro Guide जरूर पाहा.
15 Nano Banana 3D Figurine / Miniature Prompts
Category 1: Realistic Collectible Figurine
1.1
Prompt:
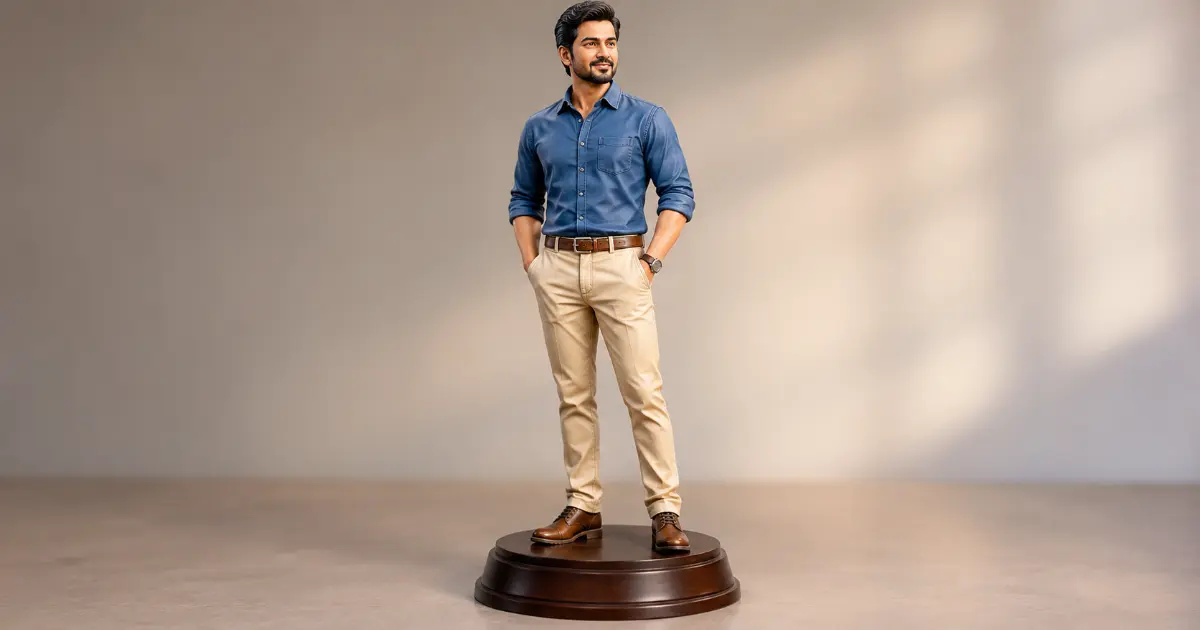
Place a small realistic figurine version of this person on a work desk next to a laptop, coffee mug, and notebook, shot from a low macro angle like professional toy photography, shallow depth of field with the background softly blurred, natural window light.
Expected Output: व्यक्तीच्या फोटोवरून प्रीमियम collectible figurine तयार होईल: acrylic base वर उभी, studio lighting मध्ये, high-end resin toy सारखा realistic texture.
Tip: Front-facing, स्पष्ट चेहरा दिसणारा फोटो वापरल्यास face detail जास्त अचूक येतो.
1.2
Prompt:
Create a museum-quality collectible statue figurine version of the person in this photo, in a heroic standing pose, painted resin material with visible fine brush texture, placed on a wooden pedestal with a small engraved nameplate. Warm gallery lighting from the side, dark blurred background.
Expected Output: एका आत्मविश्वासपूर्ण pose मध्ये statue-style figurine तयार होईल, गॅलरीत ठेवल्यासारखा professional लूक.
Tip: Pose सूचना (उभा/बसलेला/हात कसा) प्रॉम्प्टमध्ये बदलून वेगवेगळे variations मिळवता येतात.
1.3
Prompt:
Transform the subject in this image into a realistic collectible figurine wearing their exact outfit, captured in a slight three-quarter angle, standing on a transparent glass base, soft studio backlight creating a subtle rim light around the figure. Sharp focus on fabric folds and facial features.
Expected Output: ओरिजिनल outfit शी जवळपास figurine तयार होईल, आणि backlight मुळे premium collector-item feel येईल.
Tip: कपड्यांचा रंग स्पष्ट दिसणारा फोटो वापरल्यास outfit detail जास्त अचूक येतो.
Category 2: Cute Miniature Character
2.1
Prompt:
Convert this photo into an adorable chibi-style miniature figure with a slightly oversized head, big expressive eyes, and a small soft body, made of smooth vinyl toy material. Pastel color palette, standing on a tiny round platform, cute smiling expression, soft even lighting.
Expected Output: व्यक्तीचं गोंडस chibi-style miniature व्हर्जन तयार होईल, मोठे डोळे आणि लहान गोड शरीर, toy-shop मध्ये असल्यासारखं.
Tip: expression हलक्या हसऱ्या चेहऱ्याचा फोटो वापरल्यास chibi look जास्त natural येतो.
2.2
Prompt:
Turn this person into a cute miniature keychain-style figure, simplified chibi proportions, glossy plastic finish, holding a tiny accessory that represents their hobby or profession, attached to a small metal ring, photographed against a plain white background.
Expected Output: एक छोटासा keychain-style figurine तयार होईल, व्यक्तीच्या आवडीशी संबंधित छोटी वस्तू हातात धरलेली.
Tip: “hobby or profession” च्या जागी specific वस्तू (उदा. गिटार, पुस्तक, कॅमेरा) टाकल्यास जास्त personalized result मिळतो.
2.3
Prompt:
Create a squishy soft-toy style miniature version of the subject, rounded chibi body shape, felt-like matte texture, sitting cross-legged pose, pastel mini cushion beneath them, warm cozy lighting, shallow depth of field.
Expected Output: एक मऊ, गोलाकार शरीराचा, cushion वर बसलेला soft-toy स्टाईल miniature character तयार होईल, घरगुती, cozy फील.
Tip: बसलेला/relaxed pose असलेला original फोटो असल्यास pose transfer जास्त अचूक होतो.
Category 3: Action Figure + Packaging
3.1
Prompt:
Turn this photo into a realistic action figure inside a blister pack toy packaging, plastic tray mold shaped exactly around the figure and its accessories (a small bag, a phone, a cup, matching their real-life items), cardboard backing card with a bold toy-brand-style logo area left blank, product photography lighting.
Expected Output: व्यक्तीचा action figure त्याच्या स्वतःच्या वस्तूंसह blister-pack box मध्ये पॅक केलेला दिसेल, toy-store shelf वर ठेवल्यासारखा.
Tip: व्यक्तीच्या दैनंदिन वापरातल्या 2-3 वस्तू नमूद केल्यास accessories जास्त personal वाटतात.
3.2
Prompt:
Create a fully articulated action figure of the subject in a dynamic action pose, visible joint segments at shoulders, elbows, and knees like a real posable toy, standing on a black display stand, dramatic studio lighting with a slight top-down angle, sharp plastic-like material finish.
Expected Output: movable joints असलेला realistic action figure तयार होईल, एका डायनॅमिक pose मध्ये उभा.
Tip: “dynamic action pose” ऐवजी specific पोज (उदा. running, jumping, saluting) दिल्यास result जास्त अपेक्षेप्रमाणे येतो.
3.3
Prompt:
Design a retro 1980s-style action figure packaging box featuring this person as the toy, vintage cardboard box art with hand-painted illustration style background, the figure visible through a plastic window, nostalgic color grading, slight print texture on the box.
Expected Output: 80s च्या जुन्या टॉय पॅकेजिंग स्टाईलमध्ये nostalgic action figure box तयार होईल.
Tip: retro theme साठी warm, faded color tones असलेला background prompt मध्ये स्पष्ट नमूद करा.
Category 4: Toy Photography / Desk Display
4.1
Prompt:
Place a small realistic figurine version of this person on a work desk next to a laptop, coffee mug, and notebook, shot from a low macro angle like professional toy photography, shallow depth of field with the background softly blurred, natural window light.
Expected Output: figurine एका खऱ्या डेस्क सेटअपमध्ये ठेवलेला दिसेल, जणू खरा प्रॉडक्ट फोटोशूट.
Tip: डेस्कवरच्या वस्तू (लॅपटॉप, मग इ.) बदलून वेगवेगळे personal desk-setup theme तयार करता येतात.
4.2
Prompt:
Photograph a miniature figurine of the subject standing on a wooden bookshelf between small potted plants and stacked books, warm afternoon light streaming in, cozy home aesthetic, tilt-shift macro photography style making the scene look like a tiny world.
Expected Output: एक tilt-shift इफेक्टमुळे figurine खऱ्या “छोट्या जगात” उभी असल्यासारखी दिसेल, cozy घरगुती वातावरण.
Tip: “tilt-shift” शब्द prompt मध्ये ठेवल्याने miniature-world इफेक्ट जास्त प्रभावी येतो.
4.3
Prompt:
Show this person’s figurine placed on a rainy windowsill, tiny raindrops visible on the glass behind it, soft moody blue-grey lighting, cinematic toy photography style, shallow focus on the figure with a blurred rainy street visible outside.
Expected Output: एक भावनिक, सिनेमॅटिक mood असलेला toy-photography शॉट तयार होईल, पावसाळी खिडकीजवळ उभी figurine.
Tip: mood-based शॉट्ससाठी (rainy, sunset, night) lighting शब्द बदलून अनेक variations सहज मिळतात.
Category 5: Miniature Diorama Scene
5.1
Prompt:
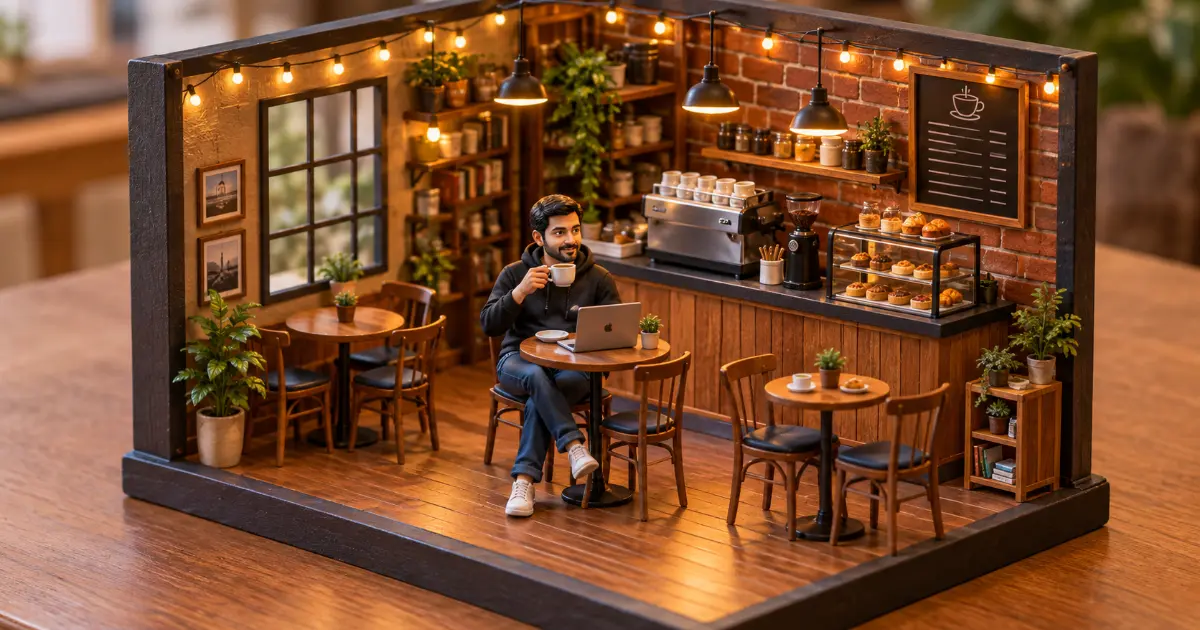
Place a miniature figurine of this person inside a tiny diorama of a cozy coffee shop, small café tables, mini coffee cups, warm string lights, wooden floor texture, isometric-style diorama box view, soft warm lighting throughout the scene.
Expected Output: एक संपूर्ण miniature coffee-shop diorama तयार होईल, ज्यामध्ये व्यक्तीची figurine त्या सेटिंगमध्ये उभी असेल.
Tip: diorama theme (कॉफी शॉप, स्टुडिओ, गार्डन इ.) व्यक्तीच्या आवडीनुसार बदलल्यास जास्त meaningful result मिळतो.
5.2
Prompt:
Create a miniature diorama scene of a small home study room with this person’s figurine sitting at a tiny desk, bookshelves behind them, a small lamp casting warm light, dust particles visible in the light beam, realistic miniature model textures on every object.
Expected Output: एक अभ्यासिका/स्टडी-रूम थीमचा संपूर्ण miniature सेट तयार होईल, figurine त्यात बसलेली दिसेल.
Tip: dust particles / light beam सारखे छोटे तपशील prompt मध्ये ठेवल्यास scene जास्त cinematic वाटतो.
5.3
Prompt:
Design a fantasy-style miniature diorama with this person’s figurine standing on a small rocky cliff, tiny trees and glowing plants around them, soft magical blue-purple ambient lighting, mist effect near the ground, museum-display glass box framing the entire scene.
Expected Output: एक fantasy थीम असलेला glowing diorama तयार होईल, जणू म्युझियम पीस.
Tip: color theme (blue-purple, green-gold इ.) बदलून वेगवेगळे fantasy moods तयार करता येतात.
Prompt Customize कसा करायचा?
वरील 15 ready-to-use आहेत, पण त्यांचा खरा फायदा तेव्हा मिळतो जेव्हा तुम्ही त्यातले specific शब्द बदलून स्वत:च्या गरजेनुसार result तयार करता. संपूर्ण नवीन prompt लिहिण्याची गरज नाही, फक्त खालील 5 components मधले शब्द बदलले तरी पुरेसं आहे.
1. Material बदला
एकाच figurine ला वेगळा फिनिश हवा असल्यास फक्त material शब्द बदला:
painted resin→ glossy vinyl → matte ceramic → brushed metal
उदा. Prompt 1.2 मध्ये painted resin material ऐवजी glossy vinyl finish
वापरल्यास तीच statue-style figurine जास्त चकचकीत, टॉय-सारखी दिसेल.
2. Pose बदला
एकाच व्यक्तीच्या वेगवेगळ्या भावमुद्रा/पोझमधल्या versions हव्या असल्यास:
heroic standing pose → walking pose → sitting pose → waving pose
उदा. Prompt 3.2 मधला dynamic action pose बदलून mid-jump pose
केल्यास figurine जास्त energetic दिसेल.
3. Lighting बदला
एकाच scene चा mood आणि visual feel बदलण्यासाठी फक्त lighting शब्द बदला:
warm gallery lighting → soft daylight → dramatic studio lighting → neon backlight
उदा. Prompt 4.2 मधली warm afternoon light ऐवजी soft blue morning light वापरल्यास तीच बुकशेल्फ सीन थंड, शांत मूडमध्ये दिसेल.
4. Base / Environment बदला
figurine कुठे उभी आहे हे बदलल्यास संपूर्ण संदर्भ (context) बदलतो:
wooden pedestal → acrylic display base → miniature garden → glass display case
उदा. Prompt 1.2 मधला wooden pedestal बदलून frosted glass display case केल्यास तीच
statue-style figurine जास्त modern/premium वाटेल.
5. Camera Angle बदला
एकाच composition ला वेगळा perspective देण्यासाठी:
three-quarter angle → low macro angle → top-down view → eye- level close-up
उदा. Prompt 4.1 मधला low macro angle बदलून top-down view केल्यास डेस्क सीन एका वेगळ्या, फ्लॅट-ले स्टाईलमध्ये दिसेल.
टीप: एकच prompt template घेऊन Material, Pose, Lighting, Environment आणि Camera Angle हे 5 शब्द बदलले, तरी एकाच फोटो आणि prompt structure मधून अनेक वेगवेगळे figurine variations तयार करता येतात.
Better Results साठी 5 Practical Tips
चांगला prompt असूनही निकाल अपेक्षेप्रमाणे न आल्यास reference photo आणि input quality चाही मोठा वाटा असतो. या 5 practical गोष्टी लक्षात घेतल्यास result जास्त अचूक येण्यास मदत होऊ शकते.
1. स्पष्ट आणि चांगल्या lighting मधला Reference Photo वापरा
धूसर, कमी प्रकाशातला किंवा अति zoom केलेला फोटो वापरल्यास AI ला चेहऱ्याचे बारकावे नीट टिपता येत नाहीत. नैसर्गिक प्रकाशात काढलेला, स्पष्ट फोटो अधिक चांगला input ठरू शकतो.
2. चेहरा स्पष्ट दिसणारा फोटो निवडा
Sunglasses, टोपी, मास्क किंवा चेहऱ्यावर सावली असलेला फोटो टाळा. Figurine किंवा miniature मध्ये चेहरा हा सर्वात लक्ष वेधणारा भाग असतो, त्यामुळे तो जितका स्पष्ट दिसेल तितका result जास्त ओळखता येण्याजोगा (recognizable) येतो.
3. Full-Body Framing असलेला फोटो वापरा (शक्य असल्यास)
Statue, action figure किंवा diorama-style prompts साठी पूर्ण शरीर दिसणारा फोटो वापरल्यास pose आणि proportions जास्त नैसर्गिक येतात. फक्त चेहऱ्याचा close-up वापरल्यास शरीराचा pose आणि proportions reference photo मधून स्पष्ट मिळत नाहीत, त्यामुळे output अपेक्षेपेक्षा वेगळा येऊ शकतो.
4. कपडे स्पष्टपणे दिसतील असा फोटो निवडा
जर तुम्हाला figurine वर तेच outfit हवं असेल (जसं Prompt 1.3 मध्ये नमूद आहे), तर कपड्यांचे रंग, पॅटर्न आणि डिझाईन स्पष्ट दिसणारा फोटो वापरा. गर्दीच्या background मुळे किंवा अंधुक फोटोमुळे outfit details नीट टिपले जात नाहीत.
5. Background मधल्या अनावश्यक वस्तू टाळा आणि Instructions स्पष्ट ठेवा
Reference photo मध्ये गर्दी असलेला किंवा distracting background असल्यास तो कधीकधी result मध्ये मिसळू शकतो. शक्य असल्यास साधा background असलेला फोटो वापरा. तसंच prompt मध्ये एकाच वेळी खूप विरोधाभासी सूचना (उदा. “realistic” आणि “cartoon style” एकत्र) देणं टाळा, यामुळे result अस्पष्ट किंवा मिश्रित येऊ शकतो.
Common Mistakes
Reference photo आणि prompt structure व्यवस्थित असूनही काही सवयींमुळे result अपेक्षेपेक्षा वेगळा येतो. या 5 सामान्य चुका टाळल्यास prompting अनुभव जास्त सोपा आणि परिणामकारक होतो.
1. एकाच Prompt मध्ये खूप जास्त Instructions देणे
Section 2 मधील 8 components वापरले तरी प्रत्येक component मध्ये फक्त आवश्यक आणि स्पष्ट information द्या. अनावश्यक details कोंबण्यापेक्षा prompt concise ठेवणं अधिक practical आहे.
2. Figurine Type स्पष्ट न सांगणे
फक्त “turn this into a figurine” इतकंच लिहिल्यास कोणत्या प्रकारचा figurine हवाय (collectible, chibi, action figure, keychain) हे AI ला ठरवावं लागतं, आणि result अपेक्षेपेक्षा वेगळा येऊ शकतो. वरील Customize section मध्ये दाखवल्याप्रमाणे figurine type नेहमी स्पष्ट नमूद करा.
3. एकाच Prompt मध्ये Conflicting Styles देणे
realistic आणि cartoon style किंवा matte finish आणि glossy chrome असे विरोधाभासी शब्द
वापरल्यास AI दोन्हीचा काहीसा मिश्रित, अस्पष्ट परिणाम तयार करतं. एका prompt मध्ये एकच सुसंगत style ठेवणं चांगलं.
अनावश्यक किंवा unwanted elements टाळण्यासाठी Negative Prompt म्हणजे काय? हे देखील उपयुक्त ठरू शकतं.
4. Packaging/Brand Text बाबत अति specific अपेक्षा ठेवणे
Action figure packaging prompts (Prompt 3.1, 3.3) मध्ये specific brand logo, अचूक शब्द किंवा readable text तयार होईल अशी अपेक्षा ठेवू नका; text आणि logo generation मध्ये कधी कधी spelling किंवा layout errors येऊ शकतात. त्याऐवजी “blank logo area” किंवा “generic toy packaging style” असं ठेवणं जास्त विश्वासार्ह result देतं.
5. पहिल्याच Output वर थांबणे
पहिला result थेट स्वीकारणे किंवा नाकारणे, यामध्ये मधला मार्ग असतो: छोटे refinement. उदा. “make the lighting warmer” किंवा “make the pose more relaxed” असे छोटे follow-up instructions दिल्यास मूळ result सुधारता येतो, संपूर्ण नवीन prompt लिहिण्याची गरज नसते.
वारंवार विचारले जाणारे प्रश्न (FAQ)
1. Nano Banana मध्ये 3D Figurine कसा बनवायचा?
Gemini मध्ये तुमचा स्पष्ट reference photo अपलोड करा आणि वर दिलेल्या 15 prompts पैकी हवा तो prompt paste करा. Prompt मध्ये figurine type, material, pose, lighting आणि environment स्पष्ट नमूद असल्यास result जास्त अपेक्षेप्रमाणे येतो.
2. Nano Banana 3D Figurine Prompts वापरताना Reference Photo आवश्यक आहे का?
या लेखातील सर्व 15 prompts reference photo वापरून तयार करण्यासाठी लिहिलेले आहेत. स्पष्ट, चांगल्या lighting मधला आणि शक्य असल्यास full-body फोटो वापरल्यास व्यक्तीची ओळख, pose आणि outfit यांसारखे तपशील output मध्ये अधिक चांगल्या प्रकारे जुळवण्यास मदत होऊ शकते.
3. एकाच फोटोपासून वेगवेगळ्या प्रकारचे Figurine तयार करता येतात का?
होय. एकच reference photo वापरून collectible statue, chibi miniature, action figure, toy-photography scene किंवा diorama असे वेगवेगळे styles तयार करता येतात, फक्त prompt मधला figurine type आणि इतर components बदलावे लागतात (Customize section पहा).
4. Nano Banana 3D Figurine Prompts English मध्येच लिहावे का?
या लेखातील prompts English मध्ये दिले आहेत कारण अनेक image-generation workflows मध्ये English prompts वापरणे practical ठरते. म्हणून ते copy-paste ready ठेवले आहेत. तुम्ही प्रॉम्प्टमधले specific शब्द (material, pose, lighting) गरजेनुसार बदलू शकता.
5. Action Figure Packaging मध्ये माझं नाव किंवा Text टाकता येईल का?
तुम्ही prompt मध्ये टेक्स्ट समाविष्ट करण्याची सूचना देऊ शकता, पण Common Mistakes मध्ये नमूद केल्याप्रमाणे text आणि logo generation मध्ये कधी कधी spelling किंवा layout errors येऊ शकतात. त्यामुळे अचूक ब्रँड लोगो किंवा दीर्घ मजकुराऐवजी “blank logo area” ठेवणं जास्त विश्वासार्ह result देतं.
6. Figurine Result अपेक्षेप्रमाणे न आल्यास काय करावे?
आधी reference photo ची quality तपासा (Better Results Tips), स्पष्ट चेहरा, पुरेसा प्रकाश आणि साधा background असल्याची खात्री करा. तरीही result अपेक्षेप्रमाणे नसल्यास संपूर्ण नवीन prompt लिहिण्याऐवजी छोटे follow-up refinement instructions द्या (Common Mistakes, Point #5).
निष्कर्ष
Nano Banana 3D Figurine Prompts वापरून स्वतःचा फोटो एका realistic collectible figurine, cute miniature character, action figure किंवा संपूर्ण diorama scene मध्ये बदलण्यासाठी आता अधिक सोपे आणि flexible पर्याय उपलब्ध आहेत. या लेखात दिलेले 15 ready-to-use prompts (Realistic Collectible Figurine, Cute Miniature Character, Action Figure + Packaging, Toy Photography आणि Miniature Diorama Scene अशा 5 वेगवेगळ्या categories मध्ये विभागलेले) तुम्हाला एकाच वेळी अनेक styles एक्सप्लोर करण्याची संधी देतात.
हे prompts जसेच्या तसे copy-paste करता येतात, आणि Material, Pose, Lighting, Environment किंवा Camera Angle सारखे घटक बदलून त्यातून आणखी अनेक variations सहज तयार करता येतात. मात्र लक्षात ठेवा: अंतिम result हा मुख्यतः reference photo च्या quality आणि prompt मधल्या स्पष्टतेवर अवलंबून असतो.
पहिला result परफेक्ट आला नाही तरी काळजी नको, छोटे refinement instructions देत हळूहळू हवा तसा figurine तयार करता येतो. त्यामुळे वेगवेगळे prompts आणि combinations experiment करत राहा.
Figurine व्यतिरिक्त तुम्हाला Instagram profile photo साठी AI prompts हवे असल्यास आमचा Instagram DP AI Prompts मराठी हा लेखही पाहू शकता.
लेखकाबद्दल
नमस्कार! माझ नाव रविंद्र पारधी, Marathi AI Prompts चा संस्थापक (Founder). गेल्या काही महिन्यांपासून मी विविध AI Image Generator टूल्सवर (Midjourney, Leonardo AI, Google Gemini, DALL-E) सातत्याने सखोल प्रयोग (Testing & Research) करत आहे. माझा मुख्य उद्देश मराठी वाचकांसाठी सोप्या भाषेत AI Prompts, Prompt Engineering आणि प्रॅक्टिकल ChatGPT Tips शेअर करणे हा आहे.
या ब्लॉगवर तुम्हाला AI Prompts संबंधित सर्व मार्गदर्शन मिळेल — साडी AI Prompts पासून ते फोटोग्राफी कीवर्ड्सपर्यंत. मी स्वतः तयार केलेले आणि टेस्ट केलेले रिझल्ट्स मी इथे मांडतो. अधिक माहितीसाठी माझं ‘Founder’ पान नक्की बघा, आणि Facebook/Instagram वर आम्हाला फॉलो करा!